> ## Documentation Index
> Fetch the complete documentation index at: https://docs.rootaccess.ai/llms.txt
> Use this file to discover all available pages before exploring further.
# 3. Run agents
> Describe your task in chat, review Seb's plan, and launch an agent.
Seb runs autonomously in a dedicated VM environment — branching off your repo, writing code, running tests, and raising a PR. You launch and track agents in one place: the **Agents** page.
**Where:** Platform → **Agents** page. The left side is your chat with Seb; the right side is the **Agents rail**, where launched jobs live.
## Launch an agent
You launch agents straight from chat — there's no separate form.
1. **Describe the task.** Open the Agents page and tell Seb what you want, in plain language: "Add CAN error-frame handling to the motor controller." Use **+** to start a fresh conversation, or the history dropdown to reopen an earlier one.
2. **Add context and tune the run (optional).**
* **Mention a ticket** — with the project [linked to Jira](/integrations/jira) or [Linear](/integrations/linear), type an identifier like `KAN-42` or `ROO-1163` and Seb pulls the ticket in as context.
* **Paste a screenshot** — drop an image into the composer (⌘/Ctrl+V).
* **Pick the branch** — the branch pill in the composer shows what Seb is reading from; click it to switch.
* **Choose a model** — the model picker in the composer; defaults to your global default from Profile → Model.
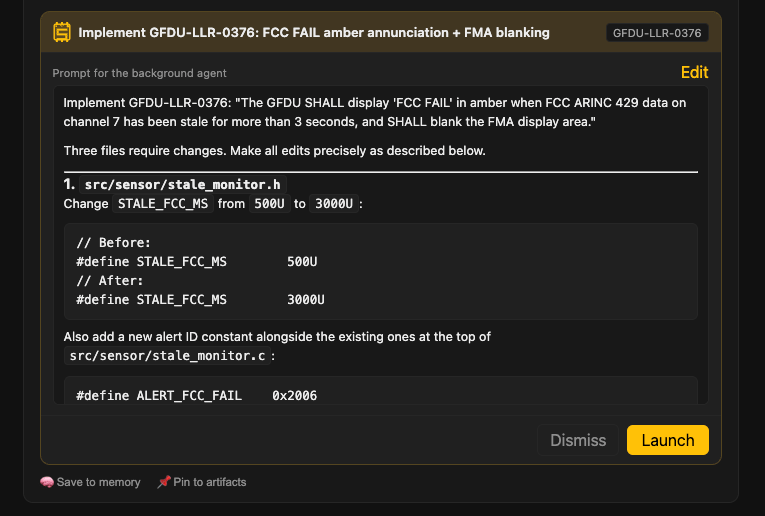
3. **Review Seb's proposal.** Seb replies with a proposal card showing a **plan** (the files it'll change) and a **test plan** (the checks it'll run, tagged cloud-VM or hardware). Edit the prompt on the card if you want to adjust scope.
4. **Launch.** Click **Launch** on the card. The job starts and shows up in the Agents rail.
 From [gap analysis](/guide/hardware-context#requirements-and-gap-analysis), **Launch agent** on a requirement card opens this page with the requirement already linked and a planning turn started — pick up at step 3.
## The Agents rail
Launched jobs are grouped by state on the right:
* **Queued** — proposed, or waiting to start.
* **In Progress** — running, or blocked on a dependency.
* **In Review** — Seb has a PR ready. Open the job for the summary, files changed, and PR link, plus **Send Back**, **Complete** (accept), and **Dismiss** (reject).
* **Needs Attention** — failed. A failed job has a **Relaunch** button that retries it fresh from the original prompt.
* **Done** — completed, dismissed, merged, or cancelled.
## Where tests happen
The agent runs your test bench procedures as part of its loop:
* **Software-only procedures** run on the agent's cloud machine. No setup needed.
* **Hardware procedures** reach your attached hardware to run tests and debug during implementation. See [Test benches](/guide/test-benches) for setup.
## Send Back
**Send Back** on a job in review opens a new chat seeded with that job's context, on its branch. Describe what needs to change, then launch a follow-up that continues on the same branch — so you refine the work instead of starting over.
Diff cards in chat also carry an **[Apply locally](/features/apply-locally)** button, which writes a change straight into your local checkout.
## Next
[Guide → 4. Set up HIL test benches](/guide/test-benches).
From [gap analysis](/guide/hardware-context#requirements-and-gap-analysis), **Launch agent** on a requirement card opens this page with the requirement already linked and a planning turn started — pick up at step 3.
## The Agents rail
Launched jobs are grouped by state on the right:
* **Queued** — proposed, or waiting to start.
* **In Progress** — running, or blocked on a dependency.
* **In Review** — Seb has a PR ready. Open the job for the summary, files changed, and PR link, plus **Send Back**, **Complete** (accept), and **Dismiss** (reject).
* **Needs Attention** — failed. A failed job has a **Relaunch** button that retries it fresh from the original prompt.
* **Done** — completed, dismissed, merged, or cancelled.
## Where tests happen
The agent runs your test bench procedures as part of its loop:
* **Software-only procedures** run on the agent's cloud machine. No setup needed.
* **Hardware procedures** reach your attached hardware to run tests and debug during implementation. See [Test benches](/guide/test-benches) for setup.
## Send Back
**Send Back** on a job in review opens a new chat seeded with that job's context, on its branch. Describe what needs to change, then launch a follow-up that continues on the same branch — so you refine the work instead of starting over.
Diff cards in chat also carry an **[Apply locally](/features/apply-locally)** button, which writes a change straight into your local checkout.
## Next
[Guide → 4. Set up HIL test benches](/guide/test-benches).